Showing posts with label sewing. Show all posts

2.26.2014

Improv Quilting Class #1

Well, it happened again.

Some friends let me coax them into taking another class, this time focusing on improvisational quilting. I know, right?  Who knew that was a thing?  I really considered calling the class "Lazy Girl Quilting" but I wanted to attract participants, not deter them.  So we're going with improv quilting, and it fits.

If you've seen me sew, you know that THIS style of quilting is for me.  Not too much planning?  Only stopping to measure sometimes?  Using scraps?  Count me in.

On top of that, there is very little ironing.  This is a delightful style of quilting, my friends ... and if you've never tried it then I suggest that you set aside your preconceived notions of improvisationalism and turn off your iron.  

Our first class focused on log cabin style piecing.  There are plenty of great tutorials online about log cabin quilts.  I posted my own back in 2010 (start here and here) when I taught my first class (again, to friends.  Wow, I have really awesome friends.)  If you want to see some of the wonky/improv log cabin quilts I've done, they're here, herehere, and (a giant log cabin block) here.


Both blocks have a center square about 3.5" x 3.5".  I say about because the whole point of improv (to me) is to forge right ahead without overthinking little details like measurements and right angles.  The strips all started off 2.5" wide and I trimmed as I went along to add some wonkiness.

The block on the right was pieced exactly the same way as the one on the left, but then I sliced it up with one cut top-to-bottom and one side-to-side.  Then I rotated the top right and bottom left pieces before resewing the block back together.  Boom.  Improv.

Very little thinking, really.  I did iron at the end, just to get it to sit nicely.

Improv Quilting!  Scraps!  Trying new things!  Friends!  I have much to be thankful for.

12.30.2013

Homemade Christmas: Fabric Game


Here's a DIY tic-tac-toe game out of fabric and felt!  This was a little gift for the nephew and niece.  I don't have a great tutorial, but here's a winging-it version:

Materials:
1 30"x30" square of blue felt
4 2"x30" strips of white felt
1 20"x20" square of red felt
1 20"x20" of brown felt
1 yard of fabric
2 6"x6" squares of cardboard
Thread, scissors, and sewing machine

For the tic-tac-toe board:
-Lay the blue felt on the fabric and trim back fabric to 2 inches all around.
-Lay the white strips on top in a tic-tac-toe board fashion, and sew through all layers (white, blue, fabric).
-Iron the fabric down 1/2" all around.  Fold it up over the edges of the blue square, and zig-zag stitch it all around to finish the edges.

For the letters:
-Cut an "x" and an "o" from the 6-inch squares of cardboard.  Trace around the letters to make 5 x's on the brown felt and 5 o's onto the red felt.
-Layer the felt on the leftover fabric.  Sew around the traced letters through all layers, then cut out the letters.

12.18.2013

Homemade Christmas: Baby Doll Carrier

Here's one of our main gifts for Big Sister - a baby doll carrier for her favorite little fuzzy kiddos.

We got the idea at one of her friend's birthday parties - we thought it was so cool and knew right away that it would be the perfect gift for our big helper!


We have an Ergo baby carrier, so I used that as a rough guide for this carrier.  There are some good tutorials out there (since it's pretty likely my vague descriptions aren't extremely helpful).  Here's a free one like a Baby Bjorn, and a reasonably priced one on Etsy from 3BeansStudio like an Ergo (it's even padded!  Nice touch).

The center rectangular panel is 9"x12" finished.  Each of the straps is 1" wide, finished.  I appliqued the dark blue rectangle on the center panel and the ribbon on the straps.

I purchased the buckles and strap adjusters from a craft store in the notions section.  A lot of baby doll carriers I saw online used ties or velcro, but our girl is so into buckling things and adjusting things that we just had to go with the big-kid version for her.  I like the idea of velcro because it is easier for self-play, but she's getting old enough that buckles are a part of the experience that she would definitely want.

I am so excited to give this to Big Sis!  I will post some pictures once she has a chance to use it.

12.16.2013

Homemade Christmas: Stockings

One thing I love about gift-giving is creativity.  The Mister and I really like to make gifts when possible, and so I'm going to share a few homemade Christmas ideas we've cooked up this year.  It gets a little tricky, though ... I think that some of the people who might receive these gifts may actually read this blog, so I'll only share the things I've made for Big Sis and Little Lady before Christmas.  You'll get to see the bigger handmade projects post-Big Day.

Homemade Christmas Stockings
For starters ... here are a couple of simple, homemade fabric stockings.  The one on the left I made in 2010, just before Big Sis was born.  I didn't get around to making Little Lady one last year (she was only a month old, after all).  But I used the same pattern that I had from before that I found stashed away in my sewing box.

For that reason, I can't remember exactly where the pattern came from!  It's basically two identical "socks" sewn separately, then one of them (kept inside out) is inserted into the other (turned right side out).  I followed a pattern similar to this one, though I did not use any batting, and the lining and cuff fabric are the same.

9.05.2013

Class Time!

I'm teaching an 8-week-long quilting class that starts tonight!  Here's a little preview:


Ready, set, sew!

8.03.2013

Baby Blocks Improv Quilt


In the course of my quilting career, I have accumulated a bunch of scraps of fabrics that I love.  I always tell myself that I will one day actually do something with them.  


Inspired by a couple of blogs that have been focusing on using fabric scraps (Crazy Mom Quilts and Scrappy Love Blog), I delved into my scrap bag for this tiny baby quilt!   This quilt is so improvisational that I'm not sure that I could ever do a real tutorial.  Basically I just grouped scraps by color, sewed them together (there's not a right angle to be found), and then cut the edges straight to make each colored block into a rectangle.


Because nothing really goes together, it all goes together.  I waffled about how to arrange the blocks, and ended up flanking each one with strips of white fabric I had on hand.  White is my go-to fabric when I'm unsure about how a quilt will turn out.  It makes it so clean, and brings into focus the colors that are there.


The quilt is backed in green with a tiny leaf print.  I strayed from my usual pieced backing and just did the whole back the same color.  It's another good call for this particular quilt!  I did add a tiny piece of green to the binding, which is otherwise white.


The final quilt measures about 24"x36" ... pretty small, but thankfully babies are small too.

Do you improv quilt?  What tips do you have?

7.27.2013

t-shirt toddler dress redo

My friend The Rambling Strawberry and I have been doing a lot of sewing together recently.  This past week she brought me a stack of toddler tshirts that her daughter had outgrown, with this one on the top of the pile:

Maybe there was a stain or something.  Anyways, a number of inches had been cut off the bottom of the shirt, but it was still in really awesome condition.  She suggested that I try to make the shirt into a dress.  She is so clever.

So we looked around in the fabric cabinet and came up with a few coordinating fabrics:

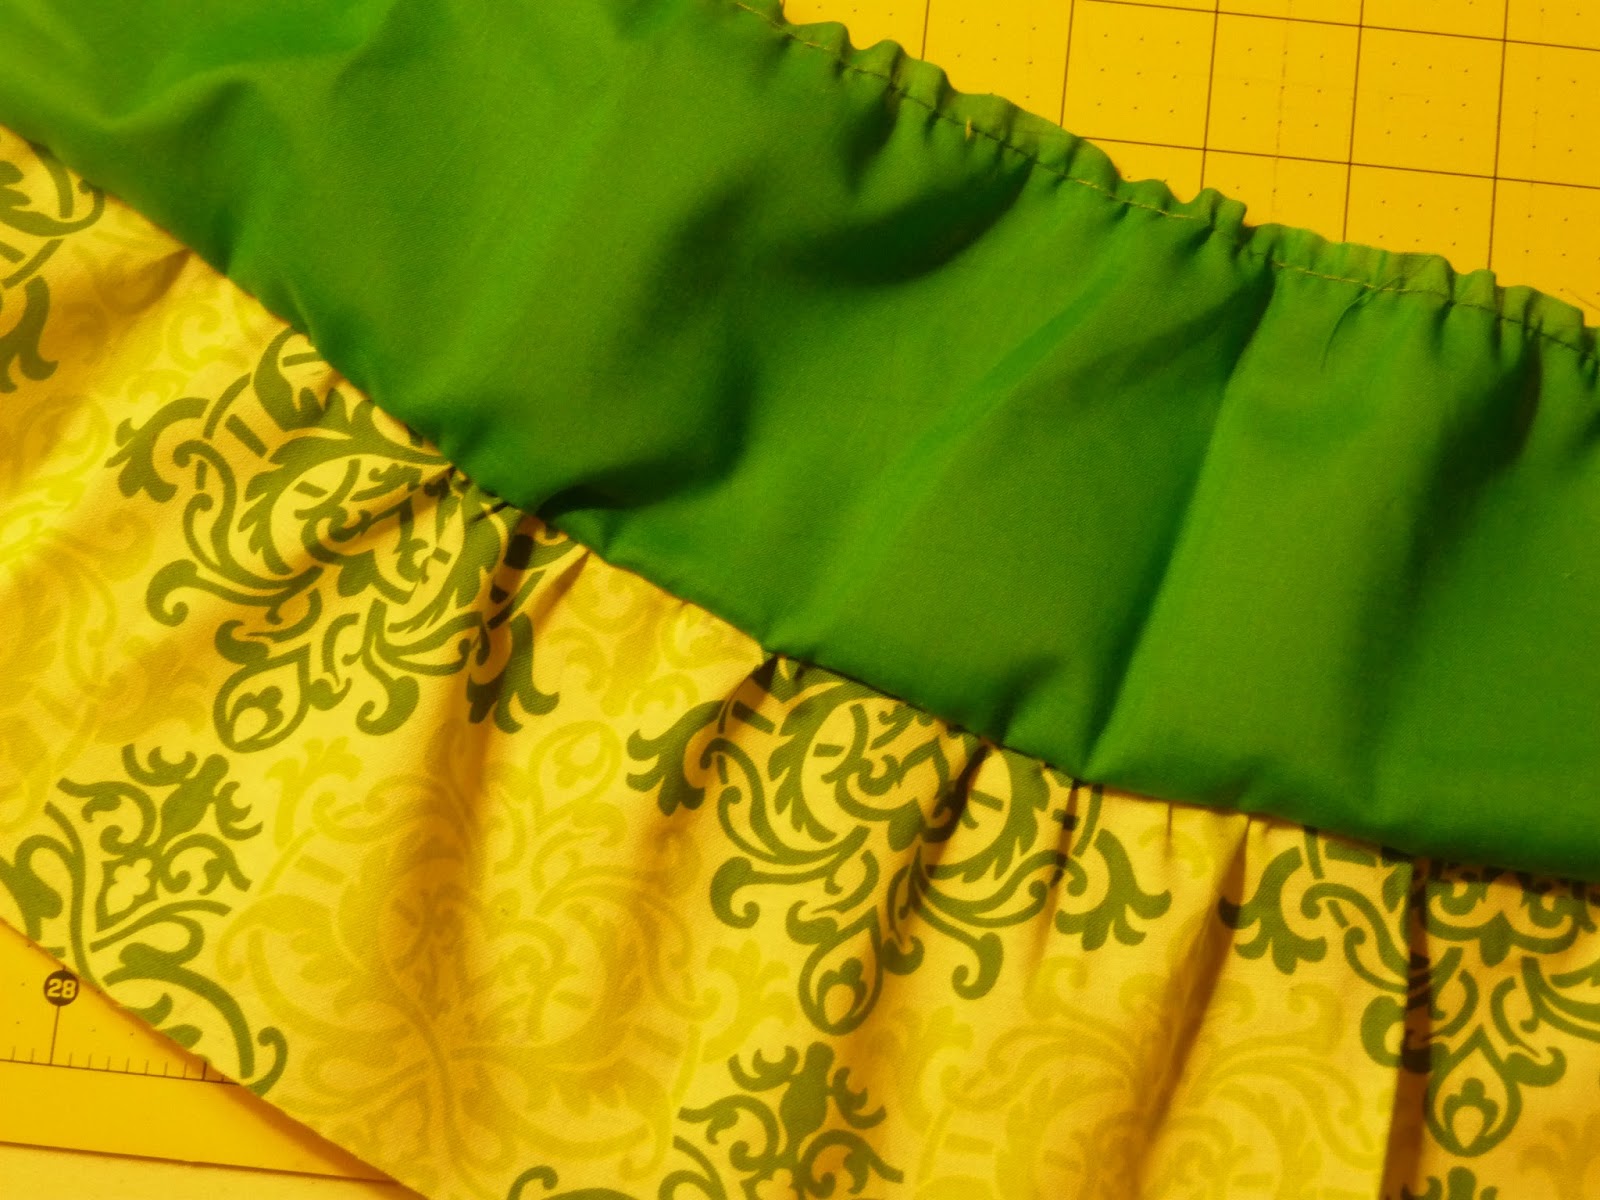
I cut them about 4 1/2" wide.  The top (floral) fabric is 35" long; the middle (green) is 40" long, and the bottom (two-tone pattern) is 45" wide.

I basted a 1/4" seam across the top of each of the fabrics then gently gathered the fabric.

Then I sewed one gathered edge to the un-gathered edge of the fabric above it.  In this case, I sewed the gathered top of the two-tone fabric to the flat edge at the bottom of the green solid fabric.

Ta-da!

I repeated the step with the top gathered edge of the green fabric and the un-gathered bottom edge of the floral fabric.

I bet you can see where I'm going with this.  Or, maybe you can't see where I'm going with this, because the picture quality is so poor.  I apologize.  It was nighttime, and I only have one lamp in my sewing space.  And this is not a blog about photography.

Ruffles!


Fact: I did not get a picture of the final step.  But what I did is I brought the two ends of the ruffled skirt together and sewed them to form a skirt tube.  Then I pinned them to the shirt and sewed that together.  Finally, I zig-zagged the bottom edge to keep it from fraying, then sewed it around again with a folded up edge.

I couldn't wait to see what myfavorite two-year-old model thought of it:


So, there it is - a toddler tshirt to toddler dress updo/redo!  Thanks Rambling Strawberry for the inspiration!

7.01.2013

Aunt E's Quilt

I know what you're thinking: a post about a quilt, in the middle of the summer?  It's too hot for that.

I agree.  But it's about time.  So, yes.

I worked on this project for over a year.  (When I say it really small like that, it's not so embarrassing that it took me that long.  Pretend that I whispered it under my breath while sheepishly glancing sideways.)


My aunt in Texas commissioned it, asking that I make something that she could have in her workspace for her clients (she is a massage therapist and supportive coach).  It is a wonky log cabin quilt in earth tones. Most of the fabric is from the Deer Valley by Joel Dewberry line which I supplemented with coordinating solids.

Here it is, finally finished!

front of quilt: Wonky Log Cabin
back of quilt: pieced backing
I love seeing quilts in their new home once I send them off, so I asked my aunt if she'd send me a picture once she had received it.

This is the quilt that I mentioned in my pre-baby to-do list last October.

Wow ... projects take waaaaay longer with babies around!

5.02.2013

Two Recent Sewing Projects

Project Number 1: Baby quilt for a friend who just had her first child - a little boy!
Baby Boy Quilt
8 1/2" squares
Pieced Back for Baby Boy Quilt
All wrapped up and ready to go

Project Number 2: Simple picnic blanket (now that lovely weather has arrived!)

2 large squares of fabric - these measure 60"x60"
Place right sides together and pin.
Sew around all four sides, leaving a space to turn right side out.
Stitch around the entire blanket.
Ready for a picnic!

4.10.2013

Easy Easter Dresses


I made Big Girl's dress using the "Back To School Tunic Dress" tutorial at Sew Mama Sew.   I like dresses that don't have zippers ... I think they're too fussy for toddlers.  Maybe when she's in high school (if she wants anything I make by then), we'll consider zippers.

Here's the fun part ... the flower patterned fabric is from a thrift store skirt I cut up.  The blue on the sleeves used to be a sheet, and the yellow was a pillowcase.

And here's Baby Girl's dress:


I used the same fabrics so that they could be coordinating without being too matchy matchy.  For a pattern, I copied a simple a-line infant dress that I had.  I used snaps at the shoulders, but could have just as easily done buttons and a buttonhole.


Happy Easter (maybe a little late ... )!

10.22.2012

An Un-tutorial for a Cape

This has nothing to do with a cape!
It's a family portrait from last week's camping.
Yes, Little Girl is in two different kinds of stripes.  Don't judge.  It was cold.
Here's a confession: I am about to give you a mediocre tutorial for a superhero cape I made.  There are much more detailed tutorials out there, like this one from howdoesshe or this one from thelongthread (which is where I got my basic inspiration), so I'm not going to reinvent the wheel.  I'll just show you what I did, and let you figure it out from there ...
(ask questions if you need to ... I'll do my best to answer, or at the very least, I'll point you to some other tutorial that has an answer).
Basic measurements
Cut two of these on the fold 
This is what it looks like when you unfold it
(no, I did not iron before cutting.  No shame.)
Add an applique if you want ... I used Wonder-Under and
had to follow the instructions on the paper, just like I have to every single time.
I didn't want to end up with a backwards 'e'.
[Insert other helpful tutorials here for detailed instructions on stitching, turning, ironing, topstitching, and adding velcro.]
Finished product!
Cape in motion
Cape + Bedhead: One Super Girl, Indeed!
This is going in Little Girl's dress-up box for Christmas (which means it's one more thing I've gotten to check off THE LIST).  I still have a few more things to add, but this was one I really wanted to get done.

2.18.2012

Vintage Quilt + Giveaway!

Today, I came in possession of an old, hand-sewn star quilt.  Sah-weet!  I'm a sucker for antique patchwork.  This is so awesome!


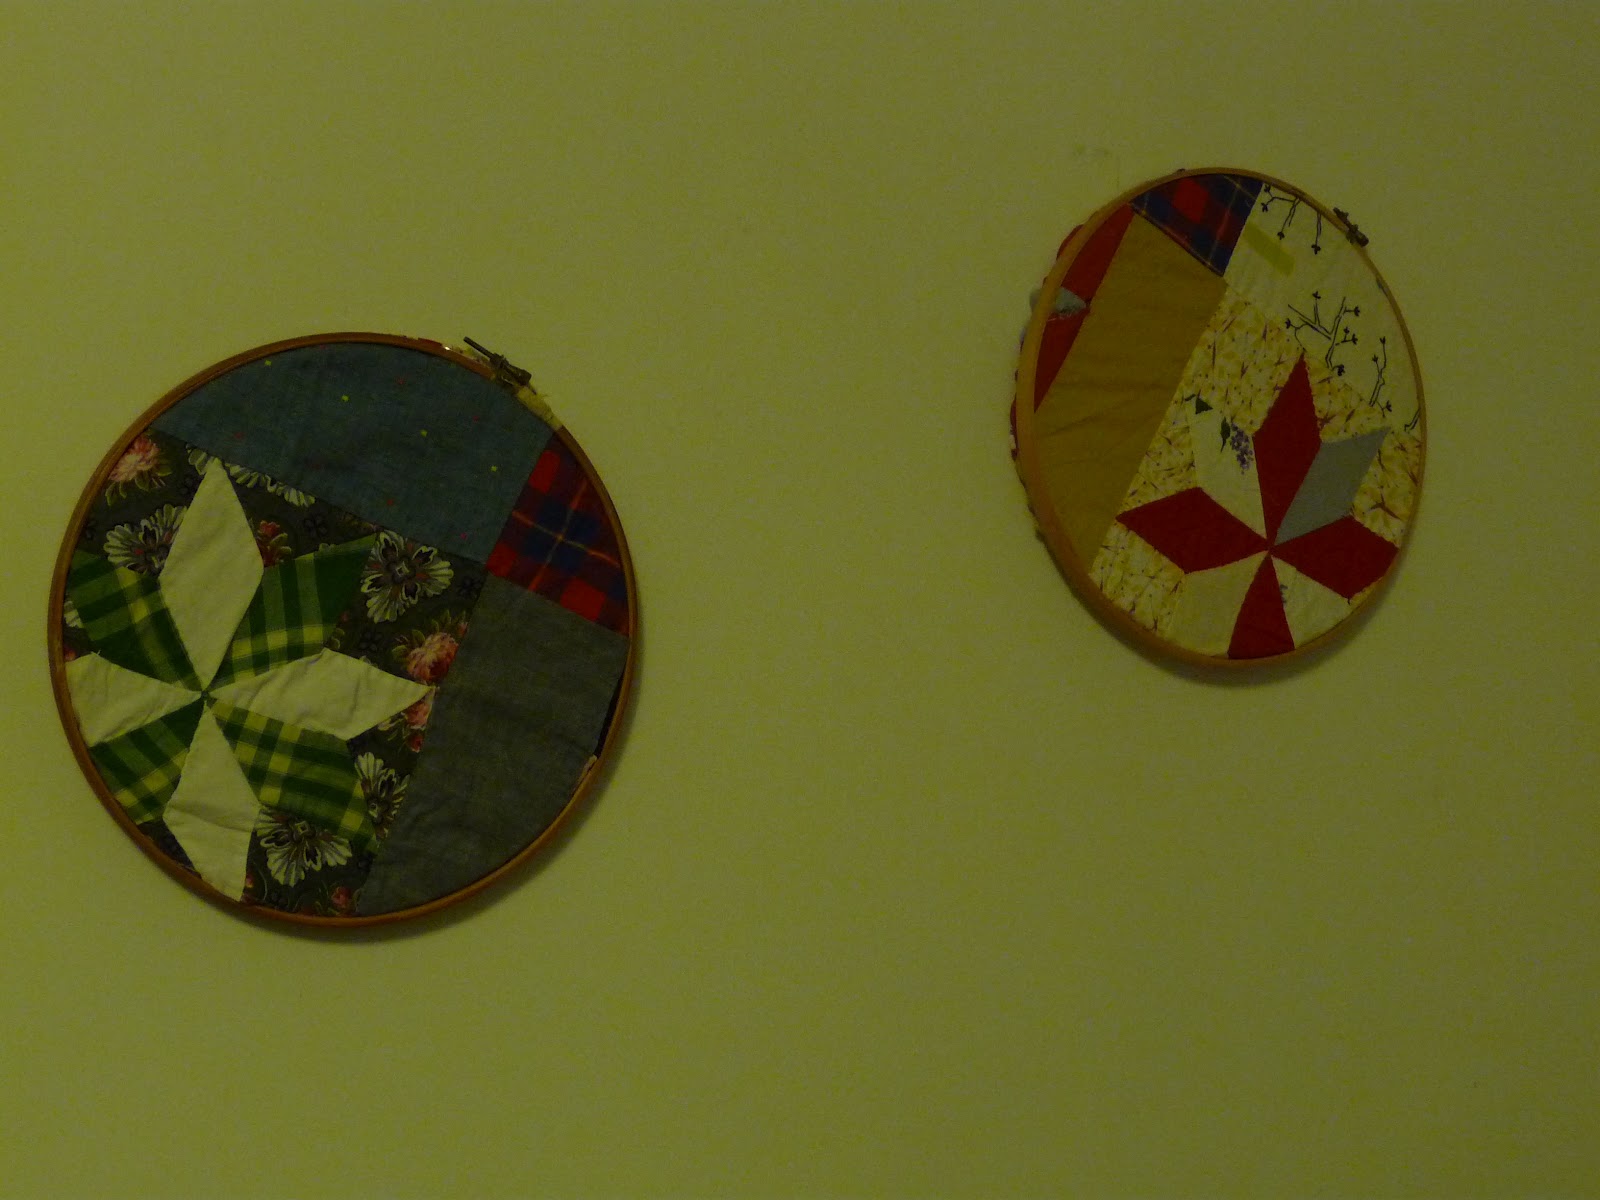
But I have to confess: I do not have the time to fix the places where seams have come apart, nor do I have the energy to be that particular.  So, I opted for the quick-and-awesome choice: wall hanging!


That's right.  Those are embroidery hoops, and I cut up (gasp!) the quilt to fit the hoops.  This way, I get to enjoy their handmade beauty every day, and didn't have to do any fixing of seams.  Furthermore, when I have a house with my own sewing room (cough IhopeyoureadthisMr.rhymeswithsmile cough), these can go on the walls of that room.  Until then, they're next to my side of the bed.  So I get to see them first thing every morning!

And, next ... a little bit of fun.  I only cut up half the quilt to use in my wall hangings.  So, I still have half the quilt that I'd like to pass along to someone who wants it.  It's 18 squares (3x6) and three of the sides are hemmed (it's pictured above ... the second picture from the top is a pretty good view of what's there).  Measures maybe 30"x60".  So, leave a comment, and tell me why you want it.  I'll randomly pick someone next Wednesday at 5:00.  I hope it's you!

Finally - Little Girl!  Look how precious.
Maybe she looks like me?

She really is happy most of the time.

something in the basket was funny, I guess.

It has been determined:
She looks like her dad (and I believe
she's wearing one of his old shirts)