9.26.2013

Worth Noting: I'm Almost Local

Dear friends,

Really, I doubted it would happen again.  So it is with great joy in my heart that I announce the following: I am feeling almost local.  Fourteen and a half months into living in our new town, I can say with a bit of gusto that I feel like I belong here.  And, maybe I even like this town.

Here's how I know that I've just teetered over the edge of Localness:

Step One: Run into someone I know at a large store.  CHECK!  I ran into a new friend at Target.  Before you think that's not too impressive, let me tell you that people from 15 different cities shop at this Target (it is therefore huge and nigh impossible to locate your car in the lot, much less an acquaintance in the store). And, this is only the second time I've been out shopping and run into someone I know in the months we've lived here.

Step Two: Have face recognition at a bank or post office.  WOOT WOOT!  When I asked a question about cashing a check, Larisa at the bank said, "Honey, I know you.  I am glad to see you today!" Oh, boy.  Feeling local, indeed.

Step Three: Recognize friends' cars around town.  This has happened off and on over the past few months, but it's starting to become a little more frequent.  I see the friends with the sedan, the mid-size SUV, the big SUV, the van ... and they wave!  They WAVE!  Huzzah!

Step Four: Have favorites.  We do!  We have our favorite bakery, favorite diner, favorite pizza, favorite Saturday activity, favorite ice cream, favorite walking route, favorite driving route, favorite farmer's market vendors, favorite season, and favorite park.  There are a few more sprinkled in there, but I'm distracted thinking about my favorite pizza and favorite ice cream.
Our Favorite Bakery
Step Five: Connect with the neighbors.  I have found that every time I move somewhere I gain a deeper sense of place and belonging once I start to connect with the people who live near me.  It happened our first summer in Virginia, not long after we got our dog - that was a big turn-around experience for me to begin putting a real face and personality with the house I had seen so often.  And it has just recently happened here in our new state - over the past months, we've met some of the families around us and have enjoyed new connections.  Literally, enjoyed ... look what the family across the street shared with us: 

So, there you have it.  It happened.  Yay!

9.23.2013

Pieced Toddler Skirts

Big Sis and PG
There are few things in life cuter than a little girl in a skirt.

The only thing that might trump it is TWO little girls in coordinating skirts.  When we were invited to spend a weekend with some friends celebrating PG's 2nd birthday, I knew I wanted to put together something that would be simple, homemade, and cute.  Oh, and quick.  I had three days.

Enter this pattern.  Pretty sure I found it on Pinterest.

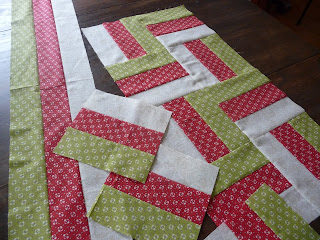
I picked up fabric remnants on clearance at Hobby Lobby (on a recent day trip there with my friend the Southern Craft Queen) and cut them into strips ranging from 3 1/2 inches to 6 1/2 inches.   For one skirt, I pieced together four strips to make a block approximately 16"x44".  I cut this in half to end up with two pieces 16"x22".  This is just slightly smaller than the average size of a fat quarter, and what I started with for the beginning of the pattern.

I followed the pattern, omitting the ribbon trim.  I just didn't feel like I needed it, given the pieced fabrics.

The skirts are essentially the same size, but I inverted the fabrics to make them look different.  PG (on the right) has a green strip above the striped, but you don't see it because of her shirt.

There are a few more details of PG's P-themed Party (pretzels!  pool!  pizza!  pineapple!  puzzles!  paint!) here.  See if you can spot me rockin' my new short haircut ... 

9.17.2013

How To Save A Watery Soup

True Story: What I thought of as culinary improvisation for dinner last night - taco soup in the crock pot - turned out to be an underwhelming soup combo with waaaay too much liquid in it.  Whoops.

Just keepin' it real.  Watery soup happens here all the time.  I'm pretending to salvage my blunder by sharing some ideas for how to roll with it ... 

Too many cooks spoil the broth, right?  Well, in my case, it would've been nice to have another cook to call me on my oops-too-brothy soup last night.  Instead, I pulled the lid off the crockpot five minutes before we were ready to sit down, and had to pull out a few tricks.  Here are some ideas for you, if by some chance you find yourself in the same boat:


1.  Add salt - too much water in soup throws off the flavor balance.  Adding salt won't help with wateriness, but it WILL help the taste.  Maybe you won't feel like you're choking down hot water for dinner.  Other spices could help too, depending on your soup: cumin and oregano for taco-style soups, coriander and curry powder for Asian soups, basil and rosemary for Italian soups.  All this assumes, of course, that you've already added salt.  Add salt first.  Do it.

2.  Add a few tablespoons (or more) of tomato paste - this thickens the broth and adds a rich tomato flavor.  Start with a good heaping tablespoon, whisk it in, and then add more as desired.  You did already add the salt, right?  Tomatoes and salt were made for each other.

3.  Puree half (or all) of the soup - again, this can thicken what broth is there.  In last night's soup scenario, I pureed about a cup or two of beans that were sitting on the bottom of the pot, then stirred it back in.

4.  If you have time, boil off some of the water.  This should take about 20-30 minutes over high heat.

5.  Serve the soup over rice or corn bread.  With salt, of course.

6.  Layer on the toppings.  Chips, salsa, cheese, sour cream, olives, jalapenos, and even fresh lettuce and tomatoes are great toppings.  And they'll make you think that you MEANT for the soup to be as liquidy as it was, to make space for all that deliciousness.

7.  Scrap it and send the Mister to McDonald's.

Well, there you go friends.  A little bit of culinary honesty, brought to you by the letter H, the number 2, and the letter O.

9.16.2013

Quilt Class

So, here's the thing - I really love quilting.  Shocker.

And I think I like teaching.  I did try a couple of years of teaching elementary school Spanish ... not sure that that was right up my alley at the time.  But I've grown a lot since then.

These friends are so kind to let me TEACH a QUILTING class one night a week!  Here's proof that they don't run off as soon as I define "selvedge" or "binding" ... 


We are working on a rail fence pattern quilt.  I will share pictures as the weeks go on.  These ladies are such good sports and I am really excited to see our quilts develop week by week!

9.10.2013

One Roast, Five Dinners (or, How To Stretch a Meat Dish)

I have been having an ongoing conversation with The Strategic Homemaker about grocery budgets.  Our food budgets are within close range, we have similar cooking styles, and we even shop at the same discount grocery store chain (can I hear it for PriceRite?!) in our two different states.  But we keep asking each other the Big Question: how do we cook delicious food AND stick to a very modest budget?

We have come to this conclusion: don't serve meat at every meal.  Or at least, don't serve a lot of it.  A little meat can go a long way.  So that's what this post is about: stretching one 5 pound roast into five meals.

Delicious Seasoned Roast


1 5-6 pound boneless pork shoulder roast, rinsed and patted dry
1 Tbsp. cumin
1 Tbsp. salt
1 Tbsp. black pepper
1 Tbsp. garlic powder
1 Tbsp. onion powder

Place the roast on a large pan or plate.  Combine the five spices.  Sprinkle - no, liberally coat - the roast with the spice mixture, pressing it in to all the crevices.  Use all the spice mixture if you can.  If you can't, make a few slits in the meat and get the spices in there.
Place the roast in a crock pot and cook on low for 8-9 hours or high 4-5 hours, or until the meat shreds apart easily.  Shred the meat.  Meat can also be frozen in a freezer bag for up to three months.

And now, my friends, five ways to use it ...

Burritos: Spoon a couple spoonfuls of cooked rice, cooked beans, and shredded meat onto a large 10- or 12-inch tortilla.  Sprinkle on some shredded cheese, a spoonful of salsa, and some sour cream or guacamole if desired.  Serve with a salad or chips.

Nachos: Spread tortilla chips out onto a large pan or dish.  Lightly sprinkle shredded cheese over chips.  Using what you have on hand, lightly layer any of the following in the dish on top of the chips: seasoned rice, seasoned beans, chopped spinach, chopped tomatoes, chopped onion, shredded and chopped meat, roasted vegetables or corn, salsa, avocado, and/or olives; sprinkle more shredded cheese on top.  Bake in a 350 degree oven for 15-20 minutes, or until heated through.
My favorite nachos have roasted sweet potatoes on them.  Try it!
Open-faced sandwiches: Butter and lightly toast split buns or rolls.  Spoon on some shredded roast, a couple slices of onion or tomato, and a thin slice or two of provolone or mozzarella cheese.  Cook under the broiler for a few minutes until the meat is warm and the cheese is melted and bubbly.

Pizza: Make a simple pizza with tomato sauce, this meat and some shredded cheese, or experiment with funky pizza creations like a barbecue sauce base, meat, bleu cheese, and carmelized onions with mozzarella cheese.   (My favorite homemade pizza dough recipe is here.)

Breakfast for dinner: Who says meat and potatoes are just for dinner?  This meat goes well with hash browns or home fries, scrambled eggs, and toast.  Or, try making a frittata by sauteing chopped shredded meat and diced vegetables in an oven-proof skillet, pouring 4-6 beaten eggs over the sauted meat/veggies (do not stir), and cooking over medium-low heat until mostly set.  Sprinkle some cheese on top and pop under the broiler for 2-4 minutes (watch closely) so the top finishes cooking.

How would you s-t-r-e-t-c-h your meat?  Leave a comment and let me know!

9.09.2013

Braised Herb Chicken Thighs with Potatoes and Carrots

Braised Herb Chicken Thighs
2 Tbsp. flour
2 tsp. paprika
1 tsp. salt
1 tsp. thyme
1 tsp. oregano
1/2 tsp. black pepper
8 chicken thighs, skinned (or other chicken pieces, skinned)
1 large onion, cut into wedges
1 1/2 c. carrot slices
1 1/2 c. chicken broth + 1/2 c. dry white wine OR 2 c. chicken broth 
1 1/2 c. quartered small red potatoes

Combine first 6 ingredients in a bag.  Add chicken, seal the bag, and shake to coat.

Heat 1 teaspoon oil in a dutch oven over medium heat.  Add chicken and remaining flour mixture to pan; cook 3 minutes on each side.  Add carrots and onions and cook for 3 minutes, stirring frequently.  

Add broth + wine (or just broth) and potatoes; bring to a boil.  Reduce heat and simmer 35 minutes or until chicken is done and vegetables are tender.

If the sauce is a little thin, you can thicken it up a little bit right at the end like this: Stir together 1 tablespoon of corn starch or flour with 1/2 cup of water until it's smooth.  Pour into the simmering broth and stir.  Sauce should thicken as it continues boiling, within a couple of minutes.  Repeat if necessary.
Potatoes, carrots, and onions

Ready to simmer
I got this recipe a LOOOOONG time ago from a friend in Virginia (who, ironically enough, had been a coworker friend of mine in North Carolina, had moved away, and then moved to Virginia the same month we did and lived a mile away from us).  I still remember how she and her husband prepared this dish for us when they had us over, and I though it was so fancy and delicious that I couldn't wait to try it myself.  

I know the first picture doesn't do it justice.  But you can trust me on this.  This is a go-to recipe.  

Yes, the taste makes me think it's fancy and difficult to execute, but as it turns out, it's really straightforward!  The "braised" part of the title is just the first couple of steps - seasoning the meat, browning it (but not fully cooking it), and then adding some liquid so that the meat cooks and tenderizes while at the same time flavoring the sauce.  

Braising is a handy skill to transfer to other recipes that call for meat cooked in liquid (like soups and stews) because it adds another layer of flavor to the meat.

That's about it.  Time to catch up on all the stuff laying around the house that needs to somehow find its rightful place!

9.05.2013

Class Time!

I'm teaching an 8-week-long quilting class that starts tonight!  Here's a little preview:


Ready, set, sew!

9.01.2013

Choroko Sauce (Ugandan Vegetarian Stew)

tomatoes, onions, and garlic
1 1/2 c. dried lentils*
2 Tbsp. oil
3 medium tomatoes, cut into bite-sized pieces
1 large onion, peeled and chopped
3 or 4 cloves of garlic, peeled and crushed
1/2 tsp. seasoned salt
dash of salt
dash of pepper
1/2 c. water

Place beans in a medium saucepan and cover with 1-2 inches of water.  Bring to a boil over high heat.  Cook for 20-25 minutes or until beans are very soft, adding more water if needed to keep the beans from sticking.
Drain beans in a colander and place in a medium bowl.  Mash well with a fork.
In a large frying pan, heat oil over medium heat for 1 minute.  Add tomatoes, onions, and garlic and saute until onions are transparent.  Add mashed beans, seasoned salt, salt, pepper, and 1/2 cup water; stir.  Simmer for 15-20 minutes.
Serve over rice.

Getting ready to make choroko sauce
*Traditional choroko sauce calls for mung beans.  I don't have any, nor do I know where to get them.  My cookbook says I can substitute split peas ... which are similar to lentils.  So that's how I made choroko with lentils.  It's a little stretch, I know.  But it worked for us.

Rice with Choroko Sauce and a Boiled Egg
It seems that no matter how hard I try, I cannot figure out how to make beans look pretty in a picture.  They are mushy.  They are brown.  They look yellow and unappetizing on camera.  So, if you need to, disregard the picture that I took, and go make yourself the real thing.  As I've said before, this isn't a photography blog, so I'm over it.

Ya'll may remember a year-long project I've been working on called the Year of Food.  Basically, the Rhymeswithsmiles are making the rounds in cultural cuisine.

We started off the year learning about and cooking Indian food (I even have a favorite curry recipe now, and can talk about a vindaloo as if I really know what's going on).  

Then we spent a number of months sampling French food: a lot of omelets and crepes, herbes de provence lavishly sprinkled on everything from potatoes to fowl, and a new covered dutch oven.  Oh, and cheese, baguettes, and wine.  Mustn't forget that.

Now we're transitioning from French food to Ethiopian food ... sorta.  It's been challenging to find cookbooks to fit the bill, so instead we're going to make it "East African food."  This is a flexible experiment.  We make the food rules, so we can change them if we need to.

This was the first of our East African meals.  It was delicious, comforting, and filling.  Yeah, it was simple, but simple is a good thing to work on.

Here's to the downhill slope of the Year of Food!