5.28.2010

This versus that

Yellow diamonds?


or blue ones?

5.27.2010

Time for Class: A Wonky Log Cabin Tutorial in 6 weeks

Today was the first day of my Wonky Log Cabin class - I am teaching some friends the improvisational techniques used for piecing wonky log cabin squares, and then we're going to go through the process of finishing and binding the quilt!  It felt OFFICIAL, in a really cool way ... I even drew illustrations on the chart paper in the room.  We all agreed that the Women's Center on campus that is letting us use their conference room is awesome.  The room is ideal and the space is perfect!  Woohoo, Women's Center!

For just in case you're interested in doing the project with us, I am going to post after each class what we do and hopefully include some pictures.
Here's the supply list:
-2 yards of coordinating fabric (in ¼ yd. or more sections – so, 4-6 different fabrics to make a total of 2 yards.)

-1 ½ yards fabric for backing
-1/3 yard fabric for binding (backing and binding fabric can be the same, in which case you could get 1 yd 28 inches fabric to make the backing and binding. Or, you can piece together fabric for the binding. Depends on if you want a “scrappy” look or a whole, seamless look)
-¾ yd. of the 90” wide Warm & Natural batting (or Warm & White), off the big bolt, or batting scraps that you can piece together.
-coordinating thread (I’d say go for at least 250 yards. I usually get “coats and clark all purpose thread” but you can get whatever you want.)
-sewing machine, bobbin, spare needles, pins, good scissors, rotary cutter, mat, and ruler.  Oh, and a good seam ripper.

Today's steps:
-Talk about the basics of making a log cabin block.  It's actually really simple, and you do the same step over and over until the block is as big as you want it.  You start with a middle square, and then add strips around it in the following order: Top, Right, Bottom, Left.  More on this later.
-Iron all fabrics.
-Re-fold fabrics so that they look like they did on the bolt.  This means that the selvedge (already finished) ends match up.  You may want to fold it again (matching the first fold with the selvedge ends), depending on how big your mat and ruler are.
-Now you want to "square off" the fabric.  This means cut off the frayed, uneven edges at a 90-degree angle to the fold, so that your fabric is square.
-Cut the fabric into strips of varying widths - I suggest anywhere from 1.5" to 3.5".  Cut straight strips (we'll make them wonky later).
-Repeat for each fabric.
-Come back next week!

Homemade Yogurt

Yogurt - from my friend SB at Market2Meal

2 c. room temperature water
2 c. milk powder
2 Tbsp. yogurt (I've read a lot that suggests plain Dannon as a good starter - it doesn't have additives in it.  Avoid the low-fat or no-fat varities for starter.  Or, if you're overseas and don't have plain Dannon, read SB's suggestions for how to get a suitable starter)
2 c. hot boiled water

Whisk together room temperature water, milk powder, and yogurt together in a bowl.  Add hot water and whisk lightly.  Pour into clean jars, and wrap in dish towels (somehow, this is the only picture I managed to take of the process).


Let set for 4-6 hours in a warm place (warming up then turning off the oven is what I did, and I left it overnight.  My friend SB wraps hers in towels and shuts them in the microwave overnight.  Whatever - just make sure it's warm).  When the time is up, remove the jars of yogurt from the towels and refrigerate.


(8 June 2010 - check out the update with my trick for getting thicker yogurt here)

My diet has been a little off recently, which is why I've been taking a surprise hiatus from the blog.  Sorry, folks.  Turns out, Mr. rhymeswithsmile and I are expecting in December (!), and it's thrown a little wrench in the whole "eating" and "cooking" thing I used to do.  I had no idea that I would develop such food aversions here in the first few months.  Just the thought of a spinach salad is enough to send me reeling.  However, I have discovered that yogurt is one of the few things that (a) sounds appetizing most times of the day and (b) doesn't make me gag.  So, prepare yourselves for a few more bland recipes over the next 4 weeks until this first trimester is over.  Then, assuming it really DOES get better like so many people tell me, I'll start posting fun and crazy things that involve ingredients like meat, and vegetables, and spices.

Poor Mr. rhymeswithsmile.  He hasn't gotten a decent meal at home in at least three weeks, maybe four.  Maybe that's why we've been going out of town a lot recently ... he knows that at least our family and friends will feed him!

5.19.2010

Growing things

First garden produce of the season!  They are about the size of marbles, but who cares - these radishes are precious.  And pink.  And spicy.  


Other things growing, too ... we'll be in touch.

5.11.2010

Tuesday Giggle

I've been wanting to make one of these ever since I started quilting.  I love the name.  I love the pattern.  

And I love red and white.
 Oh, goodness.  What a start to summer quilting, huh?  I'm in love.

I'm using the tutorial that CrazyMomQuilts posted , only I'm not going with her templates (I think templates are a waste of time when rotary cutting is an option).  One of her readers left this comment in response to her tutorial, and I've found that to be most helpful:

"Amy said ... The way I did it, which is SUPER super quick was to cut it all with the rotary cutter... I cut slight rectangles, ie 6" by 6 1/2"... this is from both the coloured fabric and the white fabric... then lay the rectangles down on my cutting mat. I then lined it up to cut my diagonals (which will be cut across the long side)... i just lay my cutting ruler across the block 2 1/2" inches in from either alternative side and sliced across the block (this makes the diagonal shape)... i was able to cut several blocks at a time like this without using a template at all... and because you have added the 1/2" the both blocks they end up a square with no trimming... i think i cut a whole quilt in under an hour! Hope this helps others (I don't have a blog to show you) but hopefully you can understand from my instructions! Cheers, Amy 5:15 PM "
 
I'll be posting more SOON!

4.27.2010

Value of 80s

This was too good NOT to share ... combines my love of the comedic with my brain full of oldies.

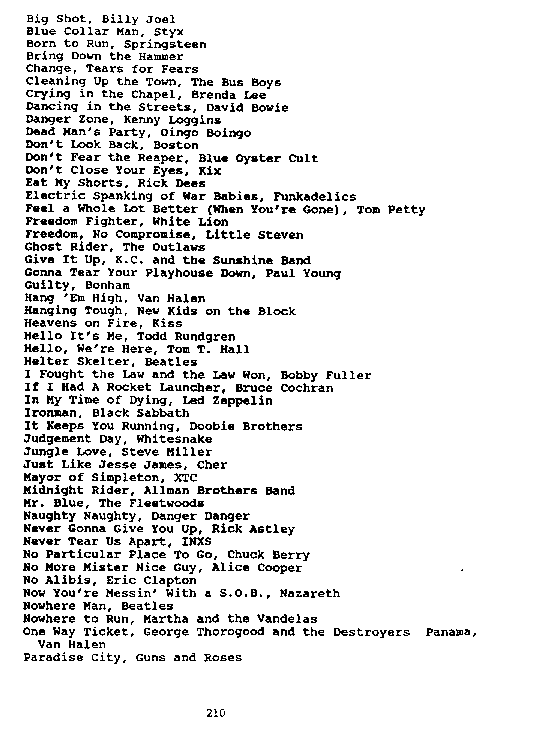
In 1989, the government of the United States blasted high-volume music at Panama's president Manuel Noriega in an attempt to force him out of hiding in the Vatican's embassy where he was avoiding capture and criminal charges.  The government played such timeless classics as "I Fought the Law and the Law Won" by Bobby Fuller and "Nowhere To Run" by Martha and the Vandellas.

It worked.  He was captured by U.S. agents and imprisoned.

So next time you groan at me for loving my "Best of the 80s, 90s, and Today" radio, just remember, it may come in handy someday.  I could topple a government with the help of Bruce Springsteen.  

See a full list of the government's favorite melodies here.  Thanks to NPR's Morning Edition for sharing the story with me.

4.24.2010

Kung Pao Chicken (sort of)

This recipe is from my friend A.H., who spent two years after college in China.  When SHE makes this, it tastes authentically Chinese.  When I make this, it tastes like a good attempt of a decent cook at coming up with something Chinese (maybe because I substituted three or four things).  Try it out anyway, though.  It's a nice change from the norm ... (Thanks, A.H.!)


Kung Pao Chicken

Marinating sauce:
1 tbsp. soy sauce
1 tbsp. rice wine or sherry (
I didn't have this, so I used rice wine VINEGAR instead)
¾ to 1 tsp. grated fresh ginger root  (
used a sprinkle or two of dried ginger instead)
1½ tbsp. cornstarch

I added in 1/4 tsp. chili oil to the marinade for a little spice
1 lb. tender chicken breast meat, tendons removed, cut in ½-in. cubes

Seasoning sauce:
2 tbsp. soy sauce
1 tbsp. rice wine or sherry (
again, substituted an equal amount of rice wine VINEGAR instead)
1 tbsp. cider vinegar
1 tbsp. sugar
½ tsp. salt
1 tsp. sesame oil (
I used vegetable oil, because I didn’t have any canola)
2 tsp. cornstarch


Other ingredients:  
½ c. canola or corn oil
½ c. peanuts, roasted and lightly salted (
I omitted this)
6 to 8 dried red peppers (
how about 1 Tbsp. dried crushed red peppers, anyone?)
2 to 3 green onions, chopped, with 1 tbsp. reserved for garnish


In a shallow dish, stir together 1 tablespoon soy sauce, 1 tablespoon rice wine, ginger root and 1½ tablespoons cornstarch. Add chicken and marinate for 30 minutes.  


Meanwhile, in a small bowl, stir together the seasoning sauce; set aside.  


Place all ingredients and the seasoning sauce within easy reach of the stove.  Put the canola oil in a wok or heavy skillet and heat until almost smoking.   Add the dried red peppers, the chicken, and the green onions, and stir-fry over high heat until all the pinkness is gone.  Add the seasoning sauce. Stir until thickened. Stir in peanuts. Enjoy! 


The semester is almost over which means ... 
... I get my husband back from the land of academia soon.  I'm very much looking forward to it ... 
... potlucks start up in just a few weeks (and we're hoping A.H. will bring some authentic Chinese dishes!) ...
... the peppers, tomatoes, and broccoli will go in the ground in mere days ... 
... I can stop wearing socks for at least the next few months (ok, well, this has more to do with summer coming than with the semester ending, but the two are identical for me) ... 
... more time for experimenting with fun recipes from friends!


One more thing ... last weekend my friend Chantry and I hosted a fun jam-making party at her house, and ended up with more jam than we know what to do with!  Check out her blog for a run-down of the events and some cute pictures!